Monday, October 13, 2014

Scala - Functions

As we know functions are group of statements to perform a piece of operation/task. We will quickly dive into the details instead of long definitions.

Syntax

def is the keyword used to define the function.
def function_name ([param1:type]{,param2:type}):returnType = {
    [Statements]
    return value;
}

Example

def sum(x:Int, y:Int) : Int =
{
   return x + y;
}

// Calling the function
val x:Int = 20;
val y:Int = 30;
var z:Int = sum(x,y);

println("Sum is "+z);
This exactly looks the way we define and call in other languages but Scala simplified the definition by making some of the tokens optional.
  • Type of the return value is optional. So function prototype can be without :returnType after arguments
  • return keyword is optional.
  • If there is only one line in the function, then braces are options. Braces required to say it's a block
Now, the above function can be defined as
def sum(x:Int, y:Int) = x + y;

Anonymous Functions

Scala provides a very simple and convenient way to define the anonymous functions. See below for an example
val sum = (x:Int, y:Int) => x + y; // val to be used instead of def keyword.

//Calling
println(sum(15,50)); //Prints 65

  • In case of anonymous functions, we don't need def keyword. We have to use val keyword instead.
  • Calling the function is same as the normal functions.
One more point here is, the parameter names are optional in case of anonymous functions. So, we can define the function as
val add5:(Int,Int)=> Int = _ + _; // No argument names

//Call the function
println(sum(15,50)); //calling is same.

Return Tuples 

Scala allows us to return multiple values as a tuple. Let's see an example of how to swap two strings using a tuple.
def swap(x:String, y:String):(String, String) = { return (y, x)}; //Returning in reverse order 
def swap2(x:String, y:String) = (y, x); //Removed optional tokens

//Calling
val (a,b) = swap("Hi","Scala");
println(a,b); //Prints Scala, Hi

val (c,d) = swap2("Hi","Scala");
println(c,d); //Prints Scala, Hi

Variable arguments 

Variable arguments can be specified to function using the operator *. Example shows the syntax and usage.
def printArgs(x:String*) = {
  for(a <- x)
  {
     println(a);
  }
}

//Calling
printArgs("Hi", "Hello", "Scala"); //Prints the strings in order.

Default and Named arguments 

Scala allows to default some of the arguments and also to pass the arguments based on the name of the parameters instead of the order
def increment(x:Int, y:Int = 1) = x + y; // Defaults the argument y to 1 if not passed

//Calling
println(increment(20)); //Increases by 1 because not passed
println(increment(20,5)); //Increases by 5 because 5 is passed

def printValues(x:String, y:Int) = {
   println(" X = "+x+" : Y = "+y);
}

//Calling
printValues(x="Hi", y=20); // Prints X = Hi : Y = 20
printValues(y=20, x="Hi"); // Prints X = Hi : Y = 20 - Even order is different because of named arguments
That's it for the current post. Happy Learning!!!

Saturday, September 27, 2014

Introduction to Scala

Scala is an acronym for Scalable Language. Scala integrates the features of both object oriented and functional languages. It's one of the languages which runs on JVM. The Scala is designed to be concise, elegant and type-safe.

Features

To keep the discussion short, i will not detail each and every feature but list some of them.
  • Object oriented
  • Functional Language
  • Statically Typed
  • Runs on JVM
  • Can execute Java Code

Getting Started

Like JDK, Scala comes with
  • scalac - Scala compiler which compiles the Scala code to byte code like javac command
  • scala - Scala interpreter and command line (called as REPL) to execute the byte code like java command
When you launch scala (without any arguments) prints the scala version and opens the scala command line, where you can execute the scala commands as below

Scala Interpretor

The interpreter helps us to be familiar with the scala language features like expressions, variables, types etc. before writing the Scala programs. The Scala Interpreter is called REPL - Read Evaluate Print Loop.


Variables and Assignments


Variables are created using var keyword and assign values with assignment operator (=).

Constants


Constants can be defined using val. Unlike variables these can't be re-assigned. These are like final keyword in Java. See below

Functions


Functions are the most important in any programming language to avoid the code duplication and organizing the code into blocks for more readability. The functions are defined in Scala using def keyword

Program Files and Running using scala command

Commands in a file


Instead of using interpreter to run the commands, write into a file with an extension .scala and call using the scala command.
The following commands are added to a file called Commands.scala
println("Hello World")
val x=20
val y=30
var z=x+y
println(z)
Run the file using scala command
# scala Commands.scala 
Hello World
50
#

Hello World using a Class


The below class is written into a file HelloWorld.scala.

object HelloWorld {
   def main(args:Array[String]) {
       if(args.length < 1)
         println("Enter your name!!!!");
       else
         println("Hello "+args(0)+"!!");
   }
}

Points to be noted 

  • HelloWorld is a class which is defined with object keyword (like class keyword in java)
  • main the method where the program start which has array of strings as an argument
  • def is the keyword to be used to define a method (rather function) 
  • The syntax is almost similar to Java language as you see in if and else conditional statement.
  • Array elements are accessed using ( unlike in Java [

Run the program

Run the program using scala command 
# scala HelloWorld.scala     
Enter your name!!!!
# scala HelloWorld.scala Veeru
Hello Veeru!!

Compile the Program


Instead, you can compile the scala program into a byte code and then run using scala command. To compile the program use scalac command.  

# scalac HelloWorld.scala 

This will create a class file called HelloWorld.class which is byte code created for the class HelloWorld.

Run the Program

Run the program using the command scala.
# scala HelloWorld      
Enter your name!!!!
# scala HelloWorld Veeru
Hello Veeru!!

As simple as that. If you have an idea of how to create and execute a Java program, Scala is almost same except the compiler and interpreter commands.


Happy Learning!!!!

Tuesday, September 23, 2014

Garbage Collection in Java

Unlike C Language, the Java allocates and de-allocates the memory automatically. De-allocation is done by garbage collector. In this post, we focus on the de-allocation (Garbage collection). Automatic garbage collection is the process of identifying the objects which are in use, then remove the unused objects and compact the memory.

The garbage collection is done by phases
  • Mark: This is the process of identifying the objects which are in use and which are not
  • Sweep: De-allocating the objects which are not in use.
  • Compact: This is to improve the performance of allocation and de-allocation. After de-allocation, the objects may spread across the memory. The compact phase brings all the referenced objects together to create the empty space at one side.
Next question that rises is, how GC knows which objects are live. If there is a reference to the still open, then it is classified as Live object (Reference Object as in the picture). Reference means referred by the program or referred by the other memory unit (Like objects in Young generation may referred by the objects in Old generation). In this case, Old generation has a fixed memory length called "card table". This card table contains the reference of the objects in Young generation which are being referred by Old generation, then GC just looks at the card table to determine the Live Object reference from Old Generation.

Garbage Collectors

There are few types of garbage collectors which are evolved over the time.  

Serial GC

Serial GC is a very old GC which can be used with the machines with single CPU. It pauses the application while going through the phases of Mark, Sweep and Compact. This GC is not performant, so may result in loosing the throughput of the application. This is the default GC on all the single CPU machines. 
Command line flag for using this GC is -XX:+UseSerialGC

Parallel GC

As the name indicates, multiple GC threads runs during the garbage collection. The number of threads created for garbage collection are equal to the number of CPUs. If there is only one CPU, its equal to the Serial GC. The number of threads can be controlled using the command line switch : -XX:ParallelGCThreads=<no_of_threads>. It's also called as "Throughput GC" as the garbage collection is done in parallel. 
The command line switch to enable the GC is : -XX:+UseParallelGC. By default, parallel threads are created for Young Generation GC, but only one thread for Old Generation GC. If we would like to add multiple threads for the Old Generation, use the command line switch : -XX:+UseParallelOldGC to enable Parallel GC with Multiple Old Generation threads (This to be used independently, not in conjunction with Parallel GC)

CMS Collector

Abbreviated to Concurrent mark sweep collector. It doesn't have an option to compact the memory after sweeping. Moreover its runs in parallel with application thread(s). 
It goes through the following phases
  • Initial Mark: First marks the objects which are very close to the class loader so the pause time of the application will be very small. 
  • Concurrent Mark: The objects referenced by the surviving objects that have just been confirmed are tracked and checked.
  • Re-mark: This step re-checks the objects which are marked in Concurrent Mark.
  • Concurrent Sweep: Here, the un-referred objects are collected to complete the garbage collection process.
Points to remember
  • All the steps runs in parallel with the application threads except "Initial Mark" step
  • After Sweep, no compaction is done to bring all the live objects together. To allocate the bigger objects in this GC, allocate more Heap because memory may not be sufficient as compaction is not done
  • This GC is used with time critical and performance required applications. 
The command line option to request the GC is : -XX:+UseConcMarkSweepGC

G1 GC

G1 GC is officially released with Java7. It was also there in Java6, but for only test purpose. In the process of the G1 Collector, we don't see the memory moving from Young to Old Generation. As shown below, the memory is allocated in blocks. Once block is full, the memory is allocated in the next block and GC will run. This is full time replacement for the CMS Collector. G1 is faster than any other type of GCs we have seen so far.

The command line to enable the GC is : -XX:+UseG1GC. To read more about G1 GC, follow the link

Happy Learning

Sunday, September 21, 2014

JSR 199 - Compiler API

JSR 199 provides the compiler API to compile the Java code inside another Java program. The following are the important classes and interfaces provided for facilitating the compilation from a Java program.
  • JavaFileObject - Represents a compilation unit, typically a class source.
  • SimpleJavaFileObject - Implementation of the methods defined in JavaFileObject
  • DiagnosticCollector - Collects the compilation errors, warning into a list of Diagnostic type
  • Diagnostic - Reports the type of the problem and details like line number, character, error reason etc. 
  • JavaFileManager - To work on the Java source and class files.
  • JavaCompiler - The compiler instance for compiling the compilation unit. 
  • CompilationTask - A sub interface of JavaCompiler which helps to compile and return the status with diagnostic when used call method on it. 

Where to start

To compile a Java code, we need the Java source. The source can be a physical file on the disk or a string inside the program. Using the source, we need create an instance type of JavaFileObject.

Using String literal

Create a class which implements JavaFileObject, here i am using SimpleJavaFileObject. We need create the path URI of the class file
package com.test;

import java.io.IOException;
import java.net.URI;

import javax.tools.SimpleJavaFileObject;

public class SampleSource extends SimpleJavaFileObject
{ 
    private String source;

    protected SampleSource(String name, String code) {
        super(URI.create("string:///" +name.replaceAll("\\.", "/") + Kind.SOURCE.extension), Kind.SOURCE);
        this.source = code ;
    }
 
    @Override
    public CharSequence getCharContent(boolean ignoreEncodingErrors)
            throws IOException {
        return source ;
    }
}
Now, create the instance of JavaFileObject and from those, create the Compilation Unit (A collection of JavaFileObject)
String str = "package com.test;"
                + "\n" + "public class Test {"
                + "\npublic static void test() {"
                + "\nSystem.out.println(\"Comiler API Test\")-;" + ""
                        + "\n}" + "\n}";

        SimpleJavaFileObject fileObject = new SampleSource("com.test.Test", str);
        JavaFileObject javaFileObjects[] = new JavaFileObject[] { fileObject };
        Iterable<? extends JavaFileObject> compilationUnits = Arrays
                .asList(javaFileObjects);

From File System

If the source is from physical location. Then create like this.
File []files = new File[]{file1, file2, file3, file4} ;
Iterable<? extends JavaFileObject> units =
           fileManager.getJavaFileObjectsFromFiles(Arrays.asList(files));

Create a JavaFileManger

We will see, how to create a fileManger now.
JavaFileManager fileManager = compiler.getStandardFileManager(
                diagnostics, Locale.getDefault(), Charset.defaultCharset());
To get the FileManger, we need
  • diagnostic - A DiagnosticCollector of JavaFileObject
  • locale - The locale of the compilation
  • charset - The charset to be used.

Compiler

Get the compiler instance using ToolProvider. Finally, create the CompilationTask from the compiler instance using diagnostics, file manager and compilation units (Optionally writer and compilation options).
JavaCompiler compiler = ToolProvider.getSystemJavaCompiler();
CompilationTask task = compiler.getTask(null, fileManager, diagnostics,
                compilationOptionss, null, compilationUnits);
The argument required to get the CompilationTask are
  • out - A writer which writes the output of the compiler. Defaults to System.err if null 
  • listener - A diagnostic listener, the errors or warning can be accessed using.
  • options - Compiler options (Ex : -d, like we give in command line using javac ) 
  • classes - Name of the classes to be processed 
  • compilationUnits - List of compilation units

Compile

Finally, call the method to compile. This method to be called only once otherwise it throws IllegalStateException on multiple calls. Once compiled, returns true for successful compilation otherwise false. We need to look the diagnosticCollector to get the error/warning details.
boolean status = task.call();

All together

Putting all together.

    public static void main(String[] args)
    {
        String str = "package com.test;"
                + "\n" + "public class Test {"
                + "\npublic static void test() {"
                + "\nSystem.out.println(\"Comiler API Test\")-;" + ""
                        + "\n}" + "\n}";

        SimpleJavaFileObject fileObject = new SampleSource("com.test.Test", str);
        JavaFileObject javaFileObjects[] = new JavaFileObject[] { fileObject };
        Iterable<? extends JavaFileObject> compilationUnits = Arrays
                .asList(javaFileObjects);

        Iterable<String> compilationOptionss = Arrays.asList(new String[] {
                "-d", "classes" });
        
        DiagnosticCollector<JavaFileObject> diagnostics = new DiagnosticCollector<JavaFileObject>();

        JavaCompiler compiler = ToolProvider.getSystemJavaCompiler();

        JavaFileManager fileManager = compiler.getStandardFileManager(
                diagnostics, Locale.getDefault(), Charset.defaultCharset());
        CompilationTask task = compiler.getTask(null, fileManager, diagnostics,
                compilationOptionss, null, compilationUnits);
        boolean status = task.call();
        
        if(!status)
        {
            System.out.println("Found errors in compilation");
            int errors = 1;
            for(Diagnostic diagnostic : diagnostics.getDiagnostics())
            {
                printError(errors, diagnostic);
                errors++;
            }
        }
        else
            System.out.println("Compilation sucessfull");
        
        try
        {
            fileManager.close();
        } catch (IOException e){}

    }
    
    public static void printError(int number,Diagnostic diagnostic)
    {
        System.out.println();
        System.out.print(diagnostic.getKind()+"  : "+number+" Type : "+diagnostic.getMessage(Locale.getDefault()));
        System.out.print(" at column : "+diagnostic.getColumnNumber());
        System.out.println(" Line number : "+diagnostic.getLineNumber());
        System.out.println("Source : "+diagnostic.getSource());
        
    }

Output

Output with an error will be (because of an hyphen in System.out.println in main method of Test)
Found errors in compilation

ERROR  : 1 Type : illegal start of expression at column : 40 Line number : 4
Source : com.test.SampleSource[string:///com/test/Test.java]

ERROR  : 2 Type : not a statement at column : 39 Line number : 4
Source : com.test.SampleSource[string:///com/test/Test.java]
To read more about JSR 199, follow the official link.

Happy Learning!!!! 

Monday, September 15, 2014

Java Heap Memory

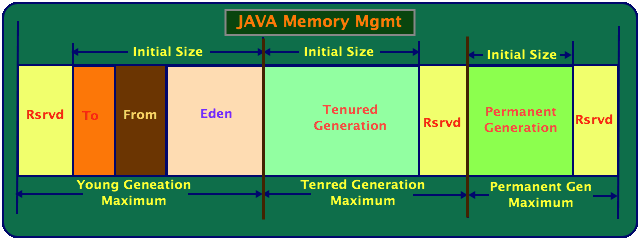
This is continuation of the previous post. As i mentioned earlier, the Java Memory is divided into multiple generations for the performance of JVM as explained below.
  • Permanent Generation
  • Old or Tenured Generation
  • Young Generation


Each of the above spaces (with minimum and maximum values) can be configurable through the command line parameters. If not configured, JVM defaults each of these based on the mode of JVM and the platform running. Initial size is the size allocated during the startup of JVM irrespective of the usage of the application and the remaining size will be reserved. When application is running out of the initial size, then it starts using the remaining space until the the maximum size is reached. Once the size reached maximum and memory can't be allocated, it throws an OutOfMemoryError exception. The total size of the heap is configured using
  • -Xms: The minimum size of the heap space
  • -Xmx: The maximum size of the heap space

Permanent Generation

Permanent generation is the part of the heap memory where the class meta data and string constants are stored. This is also one of the space which is garbage collected. Most of us (including me) think that Permanent generation is created and never GCed. GC will run on the permanent generation when there are no references on the constants or the constants are never used. The Permanent Generation space is configurable using the following two parameters
  • -XX:PermSize: Initial permanent generation size during the start of VM.
  • -XX:MaxPermSize: This is the maximum size of the permanent generation which can be expanded up-to from initial size.

Old Generation

As the name indicates, this is the pool of the objects which are survived during the full GCs. These are the objects copied from the survivor spaces (Will see this very shortly). The size of the old generation is always relative to the young generation. The parameters will be explained in conjunction with Young Generation

Young Generation

The new objects are always created in the Eden space of the Young Generation. When GC happens, the objects which are survived will be moved to the Survivor space 1 (From). Subsequently, the objects survived in the From Survivor Space will be moved to To Survivor Space. So, in short the objects are initially created in Eden and survived objects will be moved to From and To Survivor spaces and Eden space is cleared to create more new objects.
The size of the survivor space can be set relative to the Eden Space using the option -XX:SurvivorRatio. The sizes of two survivor spaces will be same. So, if we set-XX:SurvivorRatio=6, each survivor space will be one-eight of the young generation and Eden will be six-eight. 
The parameters -XX:NewSize and -XX:MaxNewSize are the initial and maximum sizes of the Young generation. The ratio between Young and Old generation is set using -XX:NewRatio. If we set -XX:NewRatio=3, then the total young generation (both Eden and Survivor space) will be one-third of the total heap size. 

Command line parameters

  • -Xms size: The minimum size of the Heap Space.
  • -Xmx size: The maximum size of the Heap Space.
  • -XX:NewSize=size: The initial size of the Young Generation.
  • -XX:MaxNewSize=size: The maximum size of the Young Generation.
  • -XX:SurvivorRatio=ratio: The ratio between survivor space and the Eden space.
  • -XX:NewRatio=ratio: The ratio between Young and Old Generations.
  • -XX:+AggressiveHeap: This parameters let the JVM to allocate the as much space as possible until the space is available on the machine. This is one of the GC tuning option to be set for long running programs. (May be for the application servers).

Points to remember

  • If the NewRatio is high, then the time between full GCs will be more
  • If the survivor spaces are tool small, then the objects will be directly moved to Old Generation without using the Survivor in case of Large objects.
  • The young and old generations are always related to minimum and maximum sizes of the Heap. 
In the next post, we will see more details on the GC and moving objects between different generations.

Happy Learning!!!!

Saturday, September 13, 2014

Java Memory Management - Overview

JVM creates various run time areas during the startup for the execution of the program. The following figure illustrates the memory model used by JVM.

JVM creates

  • Method Area
  • Native Method Stack
  • Java Stack
  • pc Register
  • Heap Space


Method Area

Method area is the space where the compiled code of all the JVM Threads contain. It stores the data common to all the threads like methods, constructors of each class, common run time variables etc. Its very similar to  Heap memory but this area couldn't get compact or clean up during the garbage collection. It is created during the startup of JVM.
  • If area is not able to allocate the request, then JVM throws an OutOfMemoryError.

Native Method Stack

This area is used to support the conventional native methods for invoke operation. This memory is for the methods written in other than Java. This area is created by the creation of the Thread.
  • If native methods require a large amount of stack than supplied, it raises StackOverflowError
  • If memory can be extended but couldn't able to allocate, it raises OutOfMemoryError

Java Stack

In other words, its JVM private method stack. This is same as Conventional method stack but used for only methods created in Java.
  • If methods require a large amount of stack than supplied, it raises StackOverflowError
  • If memory can be extended but couldn't able to allocate, it raises OutOfMemoryError

pc Register

As Java can execute multi-threads, each thread has it's own pc register to store the current instruction being executed by the thread. It contains the value only the thread is executing a non-native instruction. If the thread is executing a native instruction, it will be undefined.

Heap

Heap is the common run time work area for all the threads. It stores the local variables, collections, objects data being used by the each thread.  The reclaimed objects will be collected/removed by the automatic memory management process called Garbage Collector. The head size can be fixed by using the command line parameters otherwise it's not limited (depends on the system where the JVM is running).
To increase the performance of the JVM, the heap is divided into multiple generation as you see in the above picture. So Heap is divided into Young generation and Old or Tenured Generation and Permanent Generation. 

PermGen Space

PermGen space will be used by JVM to keep the loaded class and other common spaces like String pool. This space is directly proportional to the size of the application (classes, strings created etc.) and also GC cannot do much clean-up on this, so it will easily run out of memory with PermGen out of space error if not defined properly. 

Heap and PermGen space can be configurable using command line arguments while starting the JVM. In the next sections, will see more details on the Heap Memory, PermGen Space and Garbage Collector and their settings. 

Wednesday, September 10, 2014

CSV Operations using OpenCSV

OpenCSV is one of the best tools for CSV operations. We will see how to use OpenCSV for basic reading and writing operations.

How to use

Maven dependency for opencsv is as below
     <dependency>
	<groupId>net.sf.opencsv</groupId>
	<artifactId>opencsv</artifactId>
	<version>2.3</version>
     </dependency>

What it provides

  • CSVReader: Provides the operations to read the CSV file as a list of String array. It can used along with CsvToBean to read the data as list of beans
  • CSVWriter: Allows us to write the data to a CSV file.
  • CsvToBean: Reads the CSV data and coverts to a bean using MappingStrategy.
  • MappingStrategy: It's an interface to define the mapping between the data being written to the header of the CSV. It's been implemented by HeaderColumnNameMappingStrategy,  ColumnPositionMappingStrategy and HeaderColumnNameTranslateMappingStrategy for respective mapping formats. 

Writing to a CSV file

See below an example of writing a CSV file using CSVWriter

        String csv = "/tmp/employee.csv";
        CSVWriter writer = new CSVWriter(new FileWriter(csv));
         
        String[] header= new String[]{"Name","Age","Salary","Address"};
        writer.writeNext(header);

        List<String[]> allData = new ArrayList<String[]>();
        for(int i=0;i<3;i++)
        {
            String[] data = new String[]{"Blogger"+i,"20"+i,"20.0002",i+" World Wide Web"};
            allData.add(data);
        }
        
        writer.writeAll(allData);
        writer.close();

Points to be noted

  • CSVWriter can write line by line using writeNext
  • writeAll can used to write full CSV data at once.
  • By default, the separator will be a comma(,). If you want to make another character as a separator we can pass it as an argument.
  • The maximum possible signature of the constructor is :
    public CSVWriter(Writer writer, char separator, char quotechar, char escapechar)

Output

"Name","Age","Salary","Address"
"Blogger0","200","20.0002","0 World Wide Web"
"Blogger1","201","20.0002","1 World Wide Web"
"Blogger2","202","20.0002","2 World Wide Web"

Reading from a CSV File

Reading a csv can be done in two ways. One as a list of string array or as a bean.

Reading as an array

        CSVReader csvReader = new CSVReader(new FileReader("/tmp/employee.csv"));
        List<String[]> allData = csvReader.readAll();
        
        for(String[] data : allData)
        {
            for(String s : data)
            {
                System.out.print(s+";");
            }
            System.out.println();
        }
        
        csvReader.close();

Points to be noted

  • As CSVWriter, CSVReader also provides readNext and readAll methods to read one line or full data respectively and the delimiter can be specified while reading the file (Other than comma(,)). 
  • Adding to that, we can set the ignore spaces, default skip lines, special quote character etc.. while reading a CSV file
  • When we read as an array of string, header will not ignored. So we need to skip the first element in the list or we can specify start line while creating CSVReader. See the output below

Output

Name;Age;Salary;Address;
Blogger0;200;20.0002;0 World Wide Web;
Blogger1;201;20.0002;1 World Wide Web;
Blogger2;202;20.0002;2 World Wide Web;

Reading as a Bean

The CSV data can be read into a bean, but we need to define the mapping strategy and pass the strategy to CsvToBean to parse the data into a bean.
        Map<String, String> mapping = new HashMap<String, String>();
        mapping.put("Name", "name");
        mapping.put("Age", "age");
        mapping.put("Salary", "salary");
        mapping.put("address", "Address");
        
        HeaderColumnNameTranslateMappingStrategy<Employee> strategy = new HeaderColumnNameTranslateMappingStrategy<Employee>();
        strategy.setType(Employee.class);
        strategy.setColumnMapping(mapping);
        
        CSVReader csvReader = new CSVReader(new FileReader("/tmp/employee.csv"));
        CsvToBean<Employee> csvToBean = new CsvToBean<Employee>();
        List<Employee> list = csvToBean.parse(strategy, csvReader);
        
        for(Employee e : list)
        {
            System.out.println(e);
        }

Points to be noted 

  • Here we used HeaderColumnNameTranslateMappingStrategy which maps the column id to the bean property. 
  • CSV Reader and strategy to be passed to CsvToBean to read the data into the bean. When we parse, we get the list of bean as a result.

Output

Name : Blogger0; Age : 200; Salary : 20.0002; Addresss : 0 World Wide Web
Name : Blogger1; Age : 201; Salary : 20.0002; Addresss : 1 World Wide Web
Name : Blogger2; Age : 202; Salary : 20.0002; Addresss : 2 World Wide Web
Happy Learning!!!!

Sunday, September 7, 2014

Resource Pooling in Java

Resource pooling is the most important when we are dealing with multi-threaded, concurrent applications or multi-tier application which deal with limited resources to effectively manage them. We have APIs for pooling different resources like database connections, messages processing etc. Here, we see very simple object pooling with an example using Apache Common Pooling (ACP).

Context

A multi-threaded application accessing an resource (limited - only 3 in this case). This takes a bit long time to complete the action. I will simulate the case with a thread which takes 8s to execute.
package com.test.thread;

public class MyThread implements Runnable
{
    private boolean running = false;

    public void run()
    {
        int time = 4;   
        while(time > 0)
        {
            try
            {
                Thread.sleep(2000);
            } catch (InterruptedException e)
            {
                e.printStackTrace();
            } 
            time--;
        }
    }

    public boolean isRunning()
    {
        return running;
    }

    public void setRunning(boolean running)
    {
        this.running = running;
    }
}

Without Pooling

Consumer

The consumer uses this resources for completing a task. These are real-time consumers (not countable) which access the resource at any time.
package com.test.thread;

public class Consumer implements Runnable
{

    int i;

    public Consumer(int i)
    {
        this.i = i;
    }
    public void run()
    {
        MyThread m = null;
        try
        {
            m = new MyThread();
            System.out.println("Started " + i);
            Thread t = new Thread(m);
            t.start();
            while (t.isAlive());
            System.out.println("Completed " + i);
        } catch (Exception e)
        {
            System.out.println("Exception while getting the object " + i);
            e.printStackTrace();
        }
    }
}

Application

Assume that at any point of time we have 10 consumers accessing the MyThread. As one consumer is using one MyThread, there will be 10 MyThreads' created.
package com.test.thread.appl;

import java.util.ArrayList;
import java.util.List;
import java.util.concurrent.ExecutorService;
import java.util.concurrent.Executors;
import java.util.concurrent.Future;

import com.test.thread.Consumer;
import com.test.thread.MyThread;

public class Main
{

    public static void main(String[] args) throws Exception
    {
        ExecutorService e = Executors.newFixedThreadPool(10);
        List<Future> f = new ArrayList<Future>();
        
        for(int i=0;i<10;i++)
        {
            System.out.println("Getting the object "+i);
            Future a = e.submit(new Consumer(i));
            f.add(a);
        }
        
        label: for(Future s : f)
        {
            if(!s.isDone())
                continue label;
        }
    }
}

With Pooling

This will work as long as we don't have a limit on number of MyThread. Suppose if we limit number of MyThread to 3. Our application may run into problems because of resource shortage. To effectively handle this, we use Resource Pooling. There will be no change in the Consumer except that it gets the object from the pool instead of creating.

Pool Factory

package com.test.thread;

import org.apache.commons.pool2.BasePooledObjectFactory;
import org.apache.commons.pool2.PooledObject;
import org.apache.commons.pool2.impl.DefaultPooledObject;

public class MyThreadFactory extends BasePooledObjectFactory<MyThread>
{

    @Override
    public MyThread create() throws Exception
    {
        return new MyThread();
    }

    @Override
    public PooledObject<MyThread> wrap(MyThread arg0)
    {
        return new DefaultPooledObject<MyThread>(arg0);
    }
    
    @Override
    public boolean validateObject(PooledObject<MyThread> p)
    {
        return p.getObject().isRunning();
    }
    
    @Override
    public void activateObject(PooledObject<MyThread> p) throws Exception
    {
        p.getObject().setRunning(true);
    }
    
    @Override
    public void passivateObject(PooledObject<MyThread> p) throws Exception
    {
        p.getObject().setRunning(false);
    }

}

Consumer

Now change the consumer to load MyThread from pool.
package com.test.thread;

import org.apache.commons.pool2.impl.GenericObjectPool;

public class Consumer implements Runnable
{

    GenericObjectPool<MyThread> pool;
    int i;

    public Consumer(int i, GenericObjectPool<MyThread> pool)
    {
        this.i = i;
        this.pool = pool;
    }

    public void run()
    {
        MyThread m = null;
        try
        {
            m = pool.borrowObject();
            System.out.println("Started " + i);
            Thread t = new Thread(m);
            t.start();
            while (t.isAlive());
            System.out.println("Completed " + i);
        } catch (Exception e)
        {
            System.out.println("Exception while getting the object " + i);
            e.printStackTrace();
        }
        if (m != null)
            pool.returnObject(m);
    }
}

Points to remember: 

  • We need to get the object from the pool using borrowObject. 
  • When we finished using, it should be returned to the pool using returnObject. Otherwise we may run into resource unavailability. 
  • borrowObject can wait for specific time if the resource is not free. borrowObject(millis)

Application

package com.test.thread.appl;

import java.util.ArrayList;
import java.util.List;
import java.util.concurrent.ExecutorService;
import java.util.concurrent.Executors;
import java.util.concurrent.Future;

import org.apache.commons.pool2.impl.GenericObjectPool;
import org.apache.commons.pool2.impl.GenericObjectPoolConfig;

import com.test.thread.Consumer;
import com.test.thread.MyThread;
import com.test.thread.MyThreadFactory;

public class Main
{

    public static void main(String[] args) throws Exception
    {
        GenericObjectPoolConfig config = new GenericObjectPoolConfig();
        config.setMaxTotal(3);
        config.setBlockWhenExhausted(true);
        config.setMaxWaitMillis(30 * 1000);
        
        MyThreadFactory factory = new MyThreadFactory();
        GenericObjectPool<MyThread> pool = new GenericObjectPool<MyThread>(factory, config);
        
        ExecutorService e = Executors.newFixedThreadPool(10);
        List<Future> f = new ArrayList<Future>();
        
        for(int i=0;i<10;i++)
        {
            System.out.println("Getting the object "+i);
            Future a = e.submit(new Consumer(i,pool));
            f.add(a);
        }
        
        label: for(Future s : f)
        {
            if(!s.isDone())
                continue label;
        }
    }

}

Points to remember

  • Configuration of the pool can be set using GenericObjectPoolConfig (max Total, max time to wait etc.) 
  • Factory is used to retrieve and put back the resource. 
  • activateObject is called once the object is retrieved from the pool 
  • passivateObject reset the object after the object returns to the pool. 
  • Pool validates the object each time before fetching it. 
  • If all the resources are busy, GenericObjectPool waits for maxWaitMillis to get a resource. If not, throws an exception. The pool can be blocked by setting : blockWhenExhausted

Execution

When we run the above example, GenericObjectPool will block after 3 MyThread's are created. Once one of them returns to the object, will be resumed.
Getting the object 0
Getting the object 1
Getting the object 2
Getting the object 3
Getting the object 4
Getting the object 5
Getting the object 6
Getting the object 7
Getting the object 8
Getting the object 9
Started 0
Started 1
Started 2
Completed 0
Started 3
Completed 1
Completed 2
Started 5
Started 4
Exception while getting the object 6
Exception while getting the object 8
Exception while getting the object 7
Exception while getting the object 9
java.util.NoSuchElementException: Timeout waiting for idle object
 .....
Completed 3
Completed 5
Completed 4

Points to remember

When we look at the output, 
  • Only 3 objects were returned from the pool and it's blocked while getting next. 
  • Once one of them is completed, next is started. 
  • If the wait time is completed and no object found, throws an exception NoSuchElementException 
  • Most important point is we should clearly identify the maximum wait time when we are writing
Please read through the javadoc and examples for more details on the official site.

Happy Learning!!!

Sunday, August 24, 2014

Spring Data with MongoDB

MongoDB is an open source document database and one of most popular NoSQL databases. See mongdb official page for more details.
Spring data has an integration with the MongoDB.

How to use

Add the following dependencies to use with maven.
  • Spring-data-mongodb
  • mongodb java driver
  • Spring context related modules (As spring requires these)
  <!-- Spring framework -->
  <dependency>
   <groupId>org.springframework</groupId>
   <artifactId>spring-core</artifactId>
   <version>3.2.2.RELEASE</version>
  </dependency>
  <dependency>
   <groupId>org.springframework</groupId>
   <artifactId>spring-context</artifactId>
   <version>3.2.2.RELEASE</version>
  </dependency>

  <!-- mongodb java driver -->
  <dependency>
   <groupId>org.mongodb</groupId>
   <artifactId>mongo-java-driver</artifactId>
   <version>2.11.0</version>
  </dependency>
  <dependency>
   <groupId>org.springframework.data</groupId>
   <artifactId>spring-data-mongodb</artifactId>
   <version>1.5.2.RELEASE</version>
  </dependency>
  <dependency>
   <groupId>cglib</groupId>
   <artifactId>cglib</artifactId>
   <version>2.2.2</version>
  </dependency>

Configuration

Configuration can be done in two ways a) Using @Configuration and b) Using Spring XML

a) Using Configuration

Create a class annotated with Configuration and add two methods : mongoDbFactory() and mongoTemplate() like this.
package com.test.mongodb.config;

import org.springframework.context.annotation.Bean;
import org.springframework.context.annotation.Configuration;
import org.springframework.data.mongodb.MongoDbFactory;
import org.springframework.data.mongodb.core.MongoTemplate;
import org.springframework.data.mongodb.core.SimpleMongoDbFactory;

import com.mongodb.MongoClient;

@Configuration
public class SpringMongoConfig
{
    public @Bean
    MongoDbFactory mongoDbFactory() throws Exception
    {
        return new SimpleMongoDbFactory(new MongoClient(), "sample");
    }

    public @Bean
    MongoTemplate mongoTemplate() throws Exception
    {

        MongoTemplate mongoTemplate = new MongoTemplate(mongoDbFactory());

        return mongoTemplate;

    }
}

How to create context

Call the above configuration using : AnnotationConfigApplicationContext
    AbstractApplicationContext ctx = new AnnotationConfigApplicationContext(SpringMongoConfig.class);
    MongoOperations mongoOperation = (MongoOperations)ctx.getBean("mongoTemplate");

b) Using Spring XML File

See the following spring-config.xml file to configure mongo DB template
<beans xmlns="http://www.springframework.org/schema/beans"
 xmlns:xsi="http://www.w3.org/2001/XMLSchema-instance" xmlns:context="http://www.springframework.org/schema/context"
 xmlns:mongo="http://www.springframework.org/schema/data/mongo"
 xsi:schemaLocation="http://www.springframework.org/schema/context
          http://www.springframework.org/schema/context/spring-context-3.0.xsd
          http://www.springframework.org/schema/data/mongo
          http://www.springframework.org/schema/data/mongo/spring-mongo-1.0.xsd
          http://www.springframework.org/schema/beans
          http://www.springframework.org/schema/beans/spring-beans-3.0.xsd">

 <mongo:mongo host="127.0.0.1" port="27017" />
 <mongo:db-factory dbname="sample" />

 <bean id="mongoTemplate" class="org.springframework.data.mongodb.core.MongoTemplate">
  <constructor-arg name="mongoDbFactory" ref="mongoDbFactory" />
 </bean>

</beans>

How to create context

Create the application context using spring-config.xml as follows:
     AbstractApplicationContext ctx = new ClassPathXmlApplicationContext("spring-config.xml");
     MongoOperations mongoOperation = (MongoOperations) ctx.getBean("mongoTemplate");     
Any one of the options (a) and (b) is enough. XML configuration is always preferable.

MongoDB Document

Map the MongoDB Document using a class annotated using @Document annotation
package com.test.mongodb.entity;

import org.springframework.data.annotation.Id;
import org.springframework.data.mongodb.core.mapping.Document;

@Document(collection = "person")
public class Person
{
    @Id
    private String id;
    private String name;
    private int age;
    private double salary;
    public String getId()
    {
        return id;
    }
    public void setId(String id)
    {
        this.id = id;
    }
    public String getName()
    {
        return name;
    }
    public void setName(String name)
    {
        this.name = name;
    }
    public int getAge()
    {
        return age;
    }
    public void setAge(int age)
    {
        this.age = age;
    }
    public double getSalary()
    {
        return salary;
    }
    public void setSalary(double salary)
    {
        this.salary = salary;
    }
    @Override
    public String toString()
    {
        String str = "Person details : [id:%s, name:%s ,age:%d, salary:%f]";
        return String.format(str, id,name,age,salary);
    }
}

Operations

Operations on the MongoDB Document can be performed using using mongoOperation object.

Application

The application class will be as follows
        Person p = new Person();
        p.setId("10");
        p.setName("Joe");
        p.setAge(30);
        p.setSalary(3000.00);
        mongoOperation.save(p);
        
        //Create Query for fetching the data
        Query sQuery = new Query(Criteria.where("salary").lte(3000.00));
        Person person = mongoOperation.findOne(sQuery, Person.class);
        if(person != null)
            System.out.println("After inserting : Found Person : " + person);
        else
            System.out.println("No person found");
        
        mongoOperation.updateMulti(sQuery, 
                Update.update("salary", "40000"),Person.class);
        
        List<Person> list = mongoOperation.findAll(Person.class);
        System.out.println("After updating Size is "+(list == null ? 0: list.size()));
        if(list != null)
        {
            for(Person pr : list)
            {
                System.out.println(pr);
            }
        }
        
        Query rQuery = new Query(Criteria.where("id").is("10"));
        mongoOperation.remove(rQuery, Person.class);
        
        list = mongoOperation.findAll(Person.class);
        System.out.println("After deleteing one Person. Size is "+(list == null ? 0: list.size()));
        if(list != null)
        {
            for(Person pr : list)
            {
                System.out.println(pr);
            }
        }
        ctx.close();
Output of the above program will be :
After inserting : Found Person : Person details : [id:10, name:Joe ,age:30, salary:3000.000000]
After updating Size is 2
Person details : [id:2, name:Joe ,age:30, salary:40000.000000]
Person details : [id:10, name:Joe ,age:30, salary:40000.000000]
After deleteing one Person. Size is 1
Person details : [id:2, name:Joe ,age:30, salary:40000.000000]
Happy Learning!!!!

Sunday, August 3, 2014

Google Guava CacheBuilder

This cache is mainly used where

  • Where the same data is retrieved multiple times
  • Where the time required to access the data to be small
  • Cache size is limited and known

How to create

Cache to be created with or without CacheLoader. We will see only with CacheLoader. LoadingCache is the Cache implementation that can be created using CacheBuilder and add some properties to it and include CacheLoader to it.
         LoadingCache<String, Person> persons = CacheBuilder.newBuilder() 
                  .initialCapacity(30) 
                  .maximumSize(40) 
                  .recordStats() 
                  .build(loader);
Here Person is the object stored in Cache using key of type String. loader is the CacheLoader. See below on how to create
        CacheLoader loader = new CacheLoader()
        {
            public Person load(String key) throws Exception
            {
                return getPerson(key);
            }
        };
Loader has to be created with load method implemented with the basic operation on on how to load the object using the key.

CacheBuilder

CacheBuilder defines the properties of the cache like

  • Initial capacity: Initial capacity of the cache
  • Maximum size: The maximum size of the cache and the cache evicts the object before the size is reached.
  • Expire after access: Cache automatically removes the entry once the time is elapsed after the last access.
  • Expire after write: Cache automatically removes the entry once the time is elapsed after the last write.
  • Refresh after write: Cache retrieves the data and refreshes once the time is elapsed using load.
  • Record stats : Once this is called, the stats will be recorded on the cache and returns the status when called stats() method.

How to create CacheBuilder

Calling methods explicitly

Call each of the following methods on the CacheBuilder to set the properties 
LoadingCache<String, Person> persons = CacheBuilder.newBuilder()
                .initialCapacity(80)
                .maximumSize(20)
                .refreshAfterWrite(20, TimeUnit.HOURS)
                .expireAfterAccess(1, TimeUnit.DAYS)
                .recordStats()
                .build(loader);

Using CacheBuilderSpec

Set all the parameters in a string comma delimited in CacheBuilderSpec and pass to CacheBuilder.from(spec) to build the cache with the parameters
CacheBuilderSpec spec = CacheBuilderSpec
                .parse("initialCapacity=10,maximumSize=20,refreshInterval=20000s");
        LoadingCache<String, Person> p2 = CacheBuilder.from(spec).build(loader);

How to Access

Accessing the objects in the cache are simple using get and put methods as a HashMap.

Sample Code


        Person p = new Person();
        p.setName("Joe");
        p.setLocation("New Yrok");
        persons.put("P1", p);

        System.out.println("Size of Cache is : " + persons.size());

        Person p1 = new Person();
        p1.setName("Joy");
        p1.setLocation("New Jersy");
        persons.put("P2", p1);

        System.out.println("Size of Cache is : " + persons.size());

        Person d1 = persons.get("P1");
        System.out.println("Person is : " + d1.getName());

        System.out.println("Size of Cache is : " + persons.size());

Output will be

Size of Cache is : 1
Size of Cache is : 2
Person is : Joe
Size of Cache is : 2

Evict an object

There are different ways of evict options
Timed Eviction: Use the methods expireAfterAccess and expireAfterWrite to evict automatically after the time elapsed
Explicit Eviction:  Use the method invalidate(String) to evict one object with the given key and use invalidateAll to remove all.

Other Features

There are other important features that we can make use of when required.

Cache Stats

The cache can record stats when we explicitly call recordStats (Default is off). Once switched on, the stats() method returns the status like
  • Load Count
  • Load Exception Count
  • Load Success Count
  • Eviction Count
  • Hit rate
  • Miss rate etc.

asMap

The complete cache can be returned as map with key and values.

No InterruptedException

The cache doesn't throw InterruptedException but they are designed to make it throw. (But the documentation says (We could have designed these methods to support InterruptedException, but our support would have been incomplete, forcing its costs on all users but its benefits on only some.)

Happy Learning!!!

Sunday, May 25, 2014

Eclipse Templates

There is always a saying of re-use. Write less and do more. We will see how to create the most used templates and use them while writing the code in Eclipse.

Built-in

Eclipse provides some built-in templates for "for", "while", "ifelse" etc. Enter a character and Press Ctrl+Space to get the list of templates defined starting with that character.

Usage:

For example, let's look the following example. I would like to iterate over a list and do some processing over it. Enter "for" and then Ctrl+Space. Eclipse shows a list of options for "for"


Select one of the template and Enter. The selected code will be replaced and the variables that you would like to replace will be highlighted.
Here, iterator is the variable highlighted. Change the first occurrence of the iterator, which will change all the others.
Finally, the code looks like.

How to create custom templates

Goto Preferences. Select Java -> Editor -> Templates. There we can find list of built-in templates provided by Eclipse.
Click on "New", Opens a dialogue and start writing.

Example:

I will show how to create a template for create logger and logging statements.

Logger

${:import(org.slf4j.Logger,
org.slf4j.LoggerFactory)}

private static final Logger ${log_name} = 
   LoggerFactory.getLogger(${enclosing_type}.class.getName());

Logger Statements

Debug Logging
if(${logger:var(org.slf4j.Logger)}.isDebugEnabled()) 
   ${logger:var(org.slf4j.Logger)}.debug(${loggerstring});
${cursor}
Info Logging
${logger:var(org.slf4j.Logger)}.info(${loggerstring});
${cursor}
Error Logging
${logger:var(org.slf4j.Logger)}.error(${loggerstring},${exception_variable_name});
${cursor}

Explanation:


  • All the statements/words which comes starting with $ are the variables which can be replaced
  • ${log_name} is the name of the Logger that we can replace when used the template
  • :import will import the necessary classes when the particular template is used.
  • var(some_class) will be replaced with the variable of type "some_class" in the context.
  • ${cursor} will be the position of the cursor after template insertion and modification of the variable names.

More and more

There are many other default variables/code definitions used.
  • ${cursor} Specifies the cursor position when the template edit mode is left. This is useful when the cursor should jump to another place than to the end of the template on leaving template edit mode.
  • ${date} Evaluates to the current date.
  • ${dollar} Evaluates to the dollar symbol ‘$’. Alternatively, two dollars can be used: ‘$$’.
  • ${enclosing_method} Evaluates to the name of the enclosing name.
  • ${enclosing_method_arguments} Evaluates to a comma separated list of argument names of the enclosing method. This variable can be useful when generating log statements for many methods.
  • ${enclosing_package} Evaluates to the name of the enclosing package.
  • ${enclosing_project} Evaluates to the name of the enclosing project.
  • ${enclosing_type} Evaluates to the name of the enclosing type.
  • ${file} Evaluates to the name of the file.
  • ${line_selection} Evaluates to content of all currently selected lines.
  • ${primary_type_name} Evaluates to the name primary type of the current compilation unit.
  • ${return_type} Evaluates to the return type of the enclosing method.
  • ${time} Evaluates to the current time.
  • ${user} Evaluates to the user name.
  • ${word_selection} Evaluates to the content of the current text selection.
  • ${year} Evaluates to the current year.
Java specific templates are:

  • ${id:field(type)} Evaluates to a field in the current scope that is a subtype of the given type. If no type is specified, any non-primitive field matches. Example: ${count:field(int)}
  • ${id:var(type)} Evaluates to a field, local variable or parameter visible in the current scope that is a subtype of the given type. If no type is specified, any non-primitive variable matches. Example: ${array:var(java.lang.Object[])}
  • ${id:localVar(type)} Evaluates to a local variable or parameter visible in the current scope that is a subtype of the given type. If no type is specified, any non-primitive local variable matches.
  • ${array} is a shortcut for ${array:localVar(java.lang.Object[])}, but also matches arrays of primitive types.
  • ${collection} is a shortcut for ${collection:localVar(java.util.Collection)}.
  • ${iterable} is a shortcut for ${iterable:localVar(java.lang.Iterable)}, but also matches arrays.
  • ${id:argType(variable, n)} Evaluates to the nth type argument of the referenced template variable. The reference should be the name of another template variable. Resolves to java.lang.Object if the referenced variable cannot be found or is not a parameterized type. Example: ${type:argType(vector, 0)} ${first:name(type)} = ${vector:var(java.util.Vector)}.get(0)
  • ${id:elemType(variable)} Evaluates to the element type of the referenced template variable. The reference should be the name of another template variable that resolves to an array or an instance of java.lang.Iterable. The elemType variable type is similar to ${id:argType(reference,0)}, the difference being that it also resolves the element type of an array.
  • ${array_type} is a shortcut for ${array_type:elemType(array)}.
  • ${iterable_type} is a shortcut for ${iterable_type:elemType(iterable)}.
  • ${id:newName(reference)} Evaluates to an non-conflicting name for a new local variable of the type specified by the reference. The reference may either be a Java type name or the name of another template variable. The generated name respects the code style settings. ${index} is a shortcut for ${index:newName(int)}.
  • ${iterator} is a shortcut for ${iterator:newName(java.util.Iterator)}.
  • ${array_element} is a shortcut for ${array_element:newName(array)}.
  • ${iterable_element} is a shortcut for ${iterable_element:newName(iterable)}.
  • ${array} Evaluates to a proposal for an array visible in the current scope.
  • ${array_element} Evaluates to a name for a new local variable for an element of the ${array} variable match.
  • ${array_type} Evaluates to the element type of the ${array} variable match.
  • ${collection} Evaluates to a proposal for a collection visible in the current scope.
  • ${index} Evaluates to a proposal for an undeclared array index.
  • ${iterator} Evaluates to an unused name for a new local variable of type java.util.Iterator.
  • ${iterable} Evaluates to a proposal for an iterable or array visible in the current scope.
  • ${iterable_element} Evaluates to a name for a new local variable for an element of the ${iterable} variable match.
  • ${iterable_type} Evaluates to the element type of the ${iterable} variable match.
  • ${todo} Evaluates to a proposal for the currently specified default task tag.
Happy Learning!!!

Friday, March 21, 2014

CODING Standards

This could be most briefed post in my blog but one of the most important posts.

We are going to talk about most generic and important topic so called "Standards" (which i think to be considered for writing).

In my view, there are no coding standards that to be followed unless you like it. If you ask me write me standards i will write hell of standards. The most important point in developer world should be, the code written by one has to be understandable and able to change by others and the code should be able to evolve with the changes and shouldn't be obsolete in near future atleast .

Few points to consider while coding any kind of program/project.

  • We are capable of doing of miracles with the flexibility and feasibility given by the programming language, IDEs, frameworks, APIs but cleverness lies in how readable is it. So focus on readability.
  • Read the standards provided by the developers. For example Sun/Oracle/etc provided some standards to be followed while writing Java.  The one i like the most is Google java style
  • Every code works unless you find problems in it. Robustness lies in the way it works and how easy to find the issues and fix it.
  • Know what to write where (Read the pros or cons of any standard/usage before applying it otherwise it may go weird.)
  • Configuration v/s Performance. There is a trade of between configuration and performance. If it is too configurable, then it will be less performance and vice versa. (This is not true in all cases).
  • Judge between different ways. There can be different ways to do the same task. Analyze before implementing it. 
  • Time to Live. we heard the time to live only in messaging but developers has to think what is the life time of the code that is being written. Because after some days it may be obsolete because of the evolution of the programming languages and techniques. 
  • Research, research and research. According to me, there should enough research and reason before development, don't develop and research for problem solving. Reason enough to develop. 
Most important point i want to conclude is 
"Read, Research, Understand, Justify and write standard, re-usable and readable code which can evolve with the changing world.".

When you think about most successful frameworks and programs thats the only secret.


Sunday, March 2, 2014

Generics - Java

Generics

The main concept of Generics is to define typed variables and make the compiler to pre-check the types v/s values before actual execution of the program. So, in short, Generic type is a class or an interface which can be parameters for type. 

How to define

Generic is defined by using an angular brace like <T>.
Syntax:
class name<T1,T2,.... >
Example:
List<String> list = new ArrayList<String>();
Most of the classes (In fact all) of Collections are generic. So, when you look at the method of List class.
boolean add(E e);
E could be any type that you have defined while creating the instance of the List.

Points to be noted

So, there are couple of points to be noted before getting into the details of the generics.

What types:

Instead of looking for what types are allowed lets look at what types are not allowed because all types are allowed expect for primitives ;) 

How many:

There is no limit for the number of types that can be defined. We can define any number of types.

Where to define:

Generics can be defined for
  • Classes
  • Interfaces
  • Constructors
  • Methods

Uses

  • Introduce strong types for the custom classes, collections
  • Remove the explicit casting of objects.
  • Autoboxing / Autounboxing features can be used directly with generics.
  • Wildcards works (? extends and ? super)with generics which made the hierarchy typing as easy.

Explanation

Let's see the uses with an example for each

Strong Types and Casting

Let's define a List.
//Normal 
List oList = new ArrayList();

//Generic type
List<String> gList = new ArrayList<String>();
Here
  • aList - can store any type of element in list object and developer has to be careful enough while reading and writing into it. 
  • gList - can store only String types and compiler throws error while writing elements into it other than Strings.

Reading:
aList.add("name"); //Allowed
aList.add(1); //Allowed

gList.add("name"); //Allowed
gList.add(1) //Now allowed
Writing:
//aList operations
String str = (String)aList.get(0); //Requires explicit casting
Integer aInt = (Integer)aList.get(1); //Requires explicit casting

Integer incorrect = (Integer)aList.get(0); //No compilation error but throws runtime exception.

//gList operations
String a = gList.get(0) //No explicit casting.

Integer b = gList.get(1) //Not allowed. Compiler throws error. but still you can explicitly convert it to Integer.
Iterating:
//Using iterator
for (Iterator iter = gList.iterator(); iter.hasNext();) {
  String s = iter.next();
  System.out.print(s);
}

//Using foreach
for (String s: gList) {
   System.out.print(s);
}

Autoboxing / Autounboxing

We can define generics for any type expect for built-in types but autoboxing and unboxing works with generics like below without any issues.
//Autoboxing
Set set = new HashSet();
set.add(1);
set.add(3);

//Autounboxing
for(int s : set)
{
  System.out.println(s);
}

Wildcards

Even if we define a class with generic types, sometimes we may need to use them based on the hierarchy. It can be either a subclass declaration or super class declaration. The keywords for the wildcards used are
  • ? extends T - Any class which extends T
  • ? super T - Any class which is super to T
void eat(List<? extends Fruit> fruits); //This method accepts parameter any list of objects which is child of Fruit
void eat(List<? super Fruit> fruits); //This method accepts parameter any list of objects which is parent of Fruit 
Happy Learning!!!!

Sunday, February 23, 2014

Instrumentation using AspectJ

Many of us start writing the code without worrying about how performant it will be? Once the program started working, we will be making changes like adding logs, timing statements to check the performance.
I too used to do the same before i came across AspectJ (Even though it was there since 2003, i came across it very recently).
AspectJ is available as
  1. Eclipse plugin
  2. Standalone compiler 
Let me show you an example on how to check the execution time of a method in a Test program.

Aspect

It's pretty simple. It is more or less a Java Class with special keywords. The following is the aspect which will be called before and after a method call
mport org.aspectj.lang.Signature;

public aspect MethodExeuctionTime {
    pointcut traceMethods() : (((execution(* com.instrument.test.CommonProcessor.test(..)))
            || (execution(* com.test.InstrumentProcessor.process1(..)))
            || (execution(* com.instrument.test.CommonProcessor.test(int)))
            || (execution(* com.test.InstrumentProcessor.process3(..))))
         && !cflow(within(MethodExeuctionTime)));

    before(): traceMethods(){
        Signature sig = thisJoinPointStaticPart.getSignature();
        String name = Thread.currentThread().getName();
        TimingUtils.addStart(sig.getName(), sig.getDeclaringTypeName(), System.currentTimeMillis(),name );
    }

    after(): traceMethods(){
        Signature sig = thisJoinPointStaticPart.getSignature();
        String name = Thread.currentThread().getName();
        TimingUtils.addEnd(sig.getName(), sig.getDeclaringTypeName(), System.currentTimeMillis(), name);
    }
}

Explanation:

  • pointcut is a rule where the aspect to be implemented. Syntax is pointcut <method-name> : {conditions to execute}
  • Conditions - Here in the example says during the execution of methods provided.
  • Conditions can be specified using wild chars like (*).  Logical expressions (|| or &&).
  • Finally defined the actual method. Here we see that there are two definitions of method traceMethods (In fact they are not definitions). Which says what code to execute before the method call and after method call respectively.
TimingRecord.java and TimingUtils.java are as follows
public class TimingRecord {
    private long startTime;
    private long endTime;
    private String methodName;
    private String packageName;
    private String threadName;

    public TimingRecord(long startTime, String methodName, String packageName, String threadName) {
        this.startTime = startTime;
        this.methodName = methodName;
        this.packageName = packageName;
        this.threadName = threadName;
    }
    //getters and setters
}
import java.util.HashMap;
import java.util.Map;
import java.util.Stack;

public class TimingUtils {

    private static Map map = new HashMap();

    public static void addStart(String methodName, String type, long time, String threadName){
        String key = threadName+type+methodName;
        TimingRecord record = new TimingRecord(time, methodName, type, threadName);
        Stack stack = (Stack) map.get(key);
        if(stack == null)
            stack = new Stack();
        stack.push(record);
        map.put(key, stack);
    }

    public static void addEnd(String methodName,String type, long time, String threadName){
        String key = threadName+type+methodName;
        Stack stack = (Stack) map.get(key);
        if(stack == null || stack.size() == 0)
            return;

        TimingRecord e = (TimingRecord) stack.pop();
        if(e != null)
        {
            long millis = time - e.getStartTime();
            System.out.println("Time Taken to Execute : Type : "+type+" Thread: "+threadName+" Method : "+methodName + " Time : "+ millis +" ms.");
        }
        map.put(key, stack);
    }
}

How to Compile

Now to compile this, set ajc in your PATH and aspectjrt.jar in CLASSPATH and run the following command
  • ajc * -d ../classes -outxml -outjar aspectj.jar
This creates a jar named aspectj.jar with an xml file ajc-aop.xml inside it which tells whats the aspect name to be injected.

How to Run

  • Add the following lines to the command line of your program execution.
    • -javaagent:<path-to-aspectjlib>/aspectjweaver.jar
    • -cp <class-path>:<path-to-project>/aspectj.jar

Sample Program

Look at the following example program
package com.test;

import com.instrument.test.CommonProcessor;

public class InstrumentTest extends Thread
{
    public static void main(String[] args)
    {
        InstrumentTest i1 = new InstrumentTest();
        i1.setName("I1");
        InstrumentTest i2 = new InstrumentTest();
        i2.setName("I2");
        InstrumentTest i3 = new InstrumentTest();
        i3.setName("I3");
        i1.start();
        i2.start();
        i3.start();
    }

    public void run()
    {
        try {
            System.out.println("Started Processing : "+getName());
            InstrumentProcessor p1 = new InstrumentProcessor();
            p1.process1();
            p1.process2();
            p1.process3();
            System.out.println("Completed Processing : "+getName());
        } catch(Exception e) {
            
        }
    }
}
package com.test;

public class InstrumentProcessor
{
    public void process1() throws Exception {
        Thread.sleep(3000);
    }
    
    public void process2() throws Exception {
        Thread.sleep(4000);
    }
    
    public void process3() throws Exception {
        Thread.sleep(5000);
    }
}

Run the program 

Without instrumentation 

  • The log will be similar to
Started Processing : I1
Started Processing : I3
Started Processing : I2
Completed Processing : I2
Completed Processing : I1
Completed Processing : I3

With Instrumentation 

  • Add the parameters mentioned above (-javaagent and aspectjrt.jar,aspectj.jar to class path). 
  • The log will be
Started Processing : I1
Started Processing : I3
Started Processing : I2
Time Taken to Execute : Type : com.test.InstrumentProcessor Thread: I3 Method : process1 Time : 3006 ms.
Time Taken to Execute : Type : com.test.InstrumentProcessor Thread: I2 Method : process1 Time : 3006 ms.
Time Taken to Execute : Type : com.test.InstrumentProcessor Thread: I1 Method : process1 Time : 3006 ms.
Time Taken to Execute : Type : com.test.InstrumentProcessor Thread: I1 Method : process3 Time : 5001 ms.
Time Taken to Execute : Type : com.test.InstrumentProcessor Thread: I2 Method : process3 Time : 5001 ms.
Completed Processing : I2
Time Taken to Execute : Type : com.test.InstrumentProcessor Thread: I3 Method : process3 Time : 5003 ms.
Completed Processing : I1
Completed Processing : I3

There are so many other cases you can instrument using AspectJ. This is just one of them.

Happy Learning!!!!!

Monday, January 13, 2014

How HashMap Works

HashMap stores the values in key-value pair and works on the concept of hashing.

Hashing

Hashing is a function which generates a unique value using some algorithms and functions. The first and foremost rule of hashing function is it has to generate the same hash always for the same value.

HashMap

HashMap as mentioned earlier, works on Hashing.
  • It uses a hash table for storing the values in key-value pair. 
  • table is an linked list of type Entry (an inner class) which stores the entries for the same hashCode.
  • It can store key as null (only one).
  • It has two methods get and put for storing and retrieving the values.

Hashing in HashMap

  • To generate the hash value, we have to implement hashCode method for the key.
  • HashMap does one more level of hashing because it may be possible that our implementation may not generate unique value of hash always [As unique value of hash to be generated always].
  • Get the hashCode value defined and performs the hashing on top of it as below.
    final int hash(Object k) {
        int h = hashSeed;
        if (0 != h && k instanceof String) {
            return sun.misc.Hashing.stringHash32((String) k);
        }
        h ^= k.hashCode();
        h ^= (h >>> 20) ^ (h >>> 12);
        return h ^ (h >>> 7) ^ (h >>> 4);
    }

What equals() does?

  • The uniqueness of a key is decided both on equals and hashCode methods.
  • The hash is used for deciding the index of the bucket to store the value. 
  • equals method is used to decide the equality of the values. 
  • Two values having the same hashCode may not be equal. Those values are stored as an array in the same bucket. 
  • But, two values which are equal (true with equals method) must have same hashCode
The following diagram explains the overview of objects stored in the HashMap

  • HashMap internally stores the value in a list of buckets (named table) of type Entry.
  • Each bucket (Entry) is a linked list of key-value pairs of same hashCode.
  • Current key-value pair has a link to next entry 
  • In the above hashMap, 
    • There are two entries with hashCode H1 and three entries with hashCode H9 which are linked list
    • Only one key/value pair stored for H14 and H16
    • Other buckets are empty. 
  • While storing or retrieving a value using a key. HashMap does the following
    • Calculates the hashCode for the key 
    • Finds the bucket for the key.
    • Creates the bucket (If not exist) and stores the values in the linked list for the particular bucket [In case of put method]
    • If bucket not found, returns null. Otherwise parse through the linked list for that particular bucket and finds the entry for the key[In case of get method].

How get method works

Look at the get method of HashMap
    public V get(Object key) {
        if (key == null)
            return getForNullKey();
        Entry<K,V> entry = getEntry(key);
        return null == entry ? null : entry.getValue();
    }

Only three steps

  1. It checks for null. If the key is null, then returns the value which stored at null key.
    1. Value for null key is stored at location 0. Returns null if size is 0 otherwise value at null.
  2. Gets the bucket entry for the key.
    1. Performs hash of the key[as in above code of hash]. 
    2. Find the bucket for that entry and parse through the table (linked list) and finds the value. 
  3. If no entry found, returns null otherwise returns the value at the entry.

How put method works

The put method code is as follows
    public V put(K key, V value) {
        if (table == EMPTY_TABLE) {
            inflateTable(threshold);
        }
        if (key == null)
            return putForNullKey(value);
        int hash = hash(key);
        int i = indexFor(hash, table.length);
        for (Entry<K,V> e = table[i]; e != null; e = e.next) {
            Object k;
            if (e.hash == hash && ((k = e.key) == key || key.equals(k))) {
                V oldValue = e.value;
                e.value = value;
                e.recordAccess(this);
                return oldValue;
            }
        }
        modCount++;
        addEntry(hash, key, value, i);
        return null;
    }
Put method also works same as get method but little difference
  • If key is null, adds the value at null key (Index 0).
  • Get the bucket entry for the key.
    • Performs hash of the key[as in above code of hash]. 
    • Finds the entry with hashCode. If not there, creates it.
  • Stores the value in the particular bucket and links to the previous element in the bucket(linked list).
One Note to remember that, put method always returns the old value present at the key. If it's newly stored then returns null.

Size of HashMap

  • HashMap initially will be created with default capacity of 16. 
  • We can explicitly specify the size of hashMap with an argument (int value)
  • HashMap can have a maximum capacity of 1073741824
Happy Learning!!!!!